This post may contain affiliate links, view our disclaimer for details.
This easy Starbucks Inspired Brown Sugar Syrup is rich, with a caramel flavor and a hint of cinnamon. You only need 3 simple ingredients to make this brown sugar simple syrup, and it can be added to your favorite coffee drinks and lattes for a sweet, rich flavor!

Why You’ll love this Starbucks Copycat Brown Sugar Syrup
Calling all coffee lovers! You’re going to love this simple syrup that you can make in the comfort of your own home. I love that this syrup tastes fancy but costs pennies compared to buying coffee from your local coffee shop.
Here are a few reasons you’ll love this recipe (and why I do too!):
Emily’s Recipe Notes:
- Flavor: a sweet & rich take on a classic simple syrup- perfect for those who love a sweet taste, a caramel-like flavor and a touch of cinnamon in their tea drinks, lattes, and coffee.
- Customizable: this brown sugar syrup can be customized and can be used in so many drink recipes.
- Stovetop & Microwave Instructions: this recipe includes how to make the syrup on the stovetop and in the microwave.
- Affordable Recipe: you only need 3 pantry friendly, inexpensive ingredients.
Why We Love This Simple Syrup: I’ve been on a simple syrup kick lately! I recently made a super thick Brown Sugar Syrup for Bubble Tea, a Sweet Strawberry Simple Syrup, and a Lavender Simple Syrup. And I thought…you know what, why not make my favorite syrup from Starbucks!? So here it is- the classic Starbucks Inspired Brown Sugar Syrup (perfect for adding to brown sugar oat milk shaken espressos).
Ingredients:

This coffee simple syrup is made with just 3 simple ingredients. This recipe uses a classic syrup ratio- equal parts sugar and water. To make it, you’ll need the following:
- Light Brown Sugar
- Water
- Cinnamon Sticks
Substitutions & Add-Ins
- Brown Sugar: If you’d like a lighter syrup or less of a ‘caramel’ flavor, you can use half brown sugar and half white sugar. You could also use dark brown sugar or coconut sugar for a more intense caramel flavor. The type of brown sugar you use plays a part in the unique flavor of the syrup.
- Cinnamon Sticks: If you don’t have cinnamon sticks, you can add ½ tsp of ground cinnamon to the syrup while it simmers. Be sure to strain the mixture through a very fine metal sieve after simmering to remove any large granules of cinnamon.
- Vanilla Extract: For a vanilla aroma, add a vanilla bean or a teaspoon of vanilla extract to the syrup after it simmers.
- Pinch of Salt: Feel free to add a bit of salt to balance the sweet brown sugar taste.

Helpful Equipment
- Small Pot or saucepan
- Airtight glass bottle, container, or mason jar
- Measuring cups or digital scale
- Funnel, optional
Step-by-step Instructions
☕️ *Ingredient Quantities are in the Recipe Card Below!*
Stovetop Instructions (preferred method):
STEP 1: Mix together the brown sugar, water, and cinnamon sticks (or use 1 cinnamon stick for a very subtle cinnamon flavor).
STEP 2: Bring the mixture to a simmer over medium-low heat. Stir continuously until the brown sugar has dissolved.


STEP 3: Simmer the mixture for 2-3 minutes, then reduce the heat to low and simmer for an additional 5 minutes. The syrup will still be quite liquidy when hot.
STEP 4: Remove from the heat and let it cool for 5-10 minutes until it’s easier to handle.


Microwave Instructions
STEP 1: In a microwave-safe measuring cup (with at least a 3-cup capacity), combine the brown sugar, hot water, and the 2 cinnamon sticks.
STEP 2: Microwave the mixture on high for 2 minutes, stopping halfway to stir and to ensure that the sugar is dissolving. Then, microwave the mixture again on high for 1 minute, or until the mixture comes to a gentle simmer.
STEP 3: Remove the measuring cup from the microwave and let it cool for a few minutes. Then, remove the cinnamon sticks from the syrup and transfer the syrup to a glass bottle or container.


Using the Syrup
Use 1-2 tablespoons of this syrup (to taste of course) in your favorite drinks (or even in applications that call for a liquid sweetener)!
You can add it to hot coffee, iced coffee, cold brew, iced tea, lattes, cappuccinos, or even to desserts like ice cream.
And of course, you can absolutely use this syrup to make an iced brown sugar oat milk shaken espresso! Mix this simple syrup recipe with two shots of espresso and shake with ice to cool everything down. Then, pour over fresh ice and oat milk!

Storage Tips
Refrigerator: store the syrup in the fridge for up to 2 weeks.
Make sure to store it in an airtight container to prevent it from going bad prematurely.
Keep in mind, as the syrup cools it will become thicker!
If stored properly, the syrup can last a pretty long time in the fridge. For the best results:
- Clean and sterilize the jar prior to filling
- Tightly close the lid

Helpful Tips For Amazing Brown Sugar Syrup
Follow these simple tips for the best results!
- Use high-quality brown sugar: different sugars have different flavors, so use your favorite brown sugar for a rich taste that you’ll love!
- Stir the mixture continuously as you bring it to a simmer: to prevent the sugar from sticking to the bottom of the pot and burning.
- Keep an eye on the syrup: simmer over low heat until you reach the right consistency and make sure to stay by the pot as it cooks.
these create the best flavor & texture!

Troubleshooting
If the syrup is too thin, you can add more sugar or simmer it for 10-12 minutes instead of 8 minutes.
If the syrup is too thick, thin it out with a small amount of water.
More Starbucks Inspired Drinks
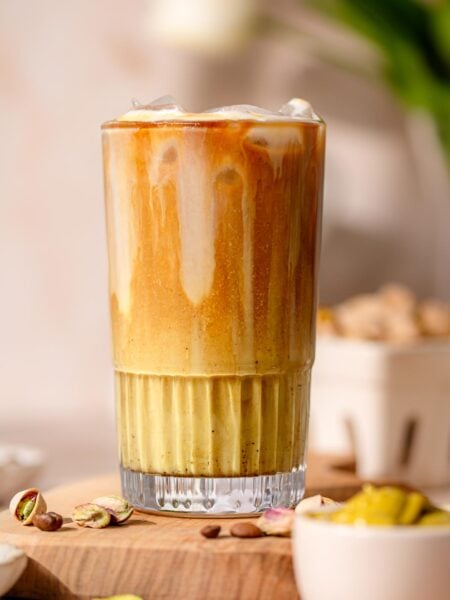


Starbucks Inspired Brown Sugar Syrup for Coffee
Rate this RecipeIngredients
- 1 cup brown sugar, 200g
- 1 cup water
- 2 cinnamon sticks
Instructions
Stovetop Instructions (preferred method):
- In a small pot, mix together the brown sugar, water, and cinnamon sticks.1 cup brown sugar, 1 cup water, 2 cinnamon sticks
- Bring the mixture to a simmer over medium-low heat. Stir continuously until the brown sugar has dissolved. Simmer the mixture for 2-3 minutes, then reduce the heat to low and simmer for an additional 5 minutes. The syrup will still be quite thin when hot.
- Remove the pot from the heat and let it cool for 5-10 minutes until the pot is easier to handle. Once cooler to the touch, remove the cinnamon sticks and pour the syrup into a heat-proof airtight glass container.
- TIP: You can use a funnel if you have one, but it isn’t necessary. If you don’t have a funnel, pour the syrup into a glass measuring cup and then use the pour spout on the measuring cup to pour the syrup into your storage container.
- Let the syrup cool completely at room temperature before storing it in the refrigerator.
Microwave Instructions:
- In a microwave-safe measuring cup (with at least a 3 cup capacity), combine the brown sugar, the water, and the 2 cinnamon sticks.
- Microwave the mixture on high for 2 minutes, stopping halfway to stir and to ensure that the sugar is dissolving.
- Microwave the mixture again on high for 1 minute, or until the mixture comes to a gentle simmer.
- Carefully remove the measuring cup from the microwave and let it cool for a few minutes. Remove the cinnamon sticks from the syrup and transfer the syrup to a glass bottle or container.
- Allow the syrup to cool completely at room temperature before transferring it in the refrigerator.
- Note: cooking times will vary depending on your microwave’s wattage. Keep an eye on the syrup as it cooks and stir it occasionally so that it doesn't boil over or overcook and burn.
Video
Recipe notes
- Use high-quality brown sugar for a richer taste.
- Stir the mixture continuously as you bring it to a simmer to prevent the sugar from sticking to the bottom of the pot and burning.
- Let the syrup cool completely at room temperature: this will help prevent crystallization.
Did You Make This?
Leave a star rating and a comment below to let others know how it turned out for you!


Want to save this recipe for later? Pin it to Pinterest!

Categories:
10 Ingredients or Less, Coffee, Coffee Shop Inspired, Drinks, Simple Syrups, Vegan Recipes,


Thank you for the recipe, absolutely dig it! Real question is, where can I find that Glass and Cork set though?
Hi, thank you! The glass is from World Market. Unfortunately, the cork is something I just had lying around the house, but I’m pretty sure World Market sells other glasses with corks included.
IKEA
Hi there! How long could I store this in the fridge?
It should last for about a week, but if it’s stored in a sterilized jar it could last much longer than that!
OH…EM…GEE
Sitting at home working and thinking I wanted an iced brown sugar espresso but didn’t want to go to Starbucks or spend that much money. Just made this without the cinnamon and I’m convinced this is better than Starbucks syrup. It is amazing and only took a few minutes on the stove. Gets perfect consistency when it cools. Thank you so much for sharing!!
So glad you enjoyed the recipe!
Going to test this out since starbucks stopped selling their brown sugar cold brew in stores!! What type of coffee blend does everyone add this syrup to? I am new to making coffee like this at home and want to know a good base to add the syrup to 🙂
You could use Starbucks Cold Brew Concentrate from the grocery store for an easy option, or if you’re making espresso-based drinks, I’d recommend adding the syrup to a blonde espresso roast—it’s super smooth, which pairs really well with the brown sugar syrup. Let me know how it turns out!
This syrup is amazing. Only change I made is that I put 1 teaspoon of Mexican vanilla extract. I made it for my coffee and when you see how inexpensive it is to make this syrup and your own coffee at home you will wonder why you didn’t do it long ago.
One suggestion: Try not to take a spoon and taste the syrup alone. It can lead to you eating/drinking all of it in a day. Just sayin. It’s amazing!!
Hi Tammy! Thanks so much for your comment. Mexican vanilla extract sounds lovely and I’m so glad you enjoyed the recipe 🙂
Should the lid be on while it simmers? REALLY hoping I make this right the 1st time around! I Ama SO excited!
Hi Jenna, no lid is required!