This post may contain affiliate links, view our disclaimer for details.
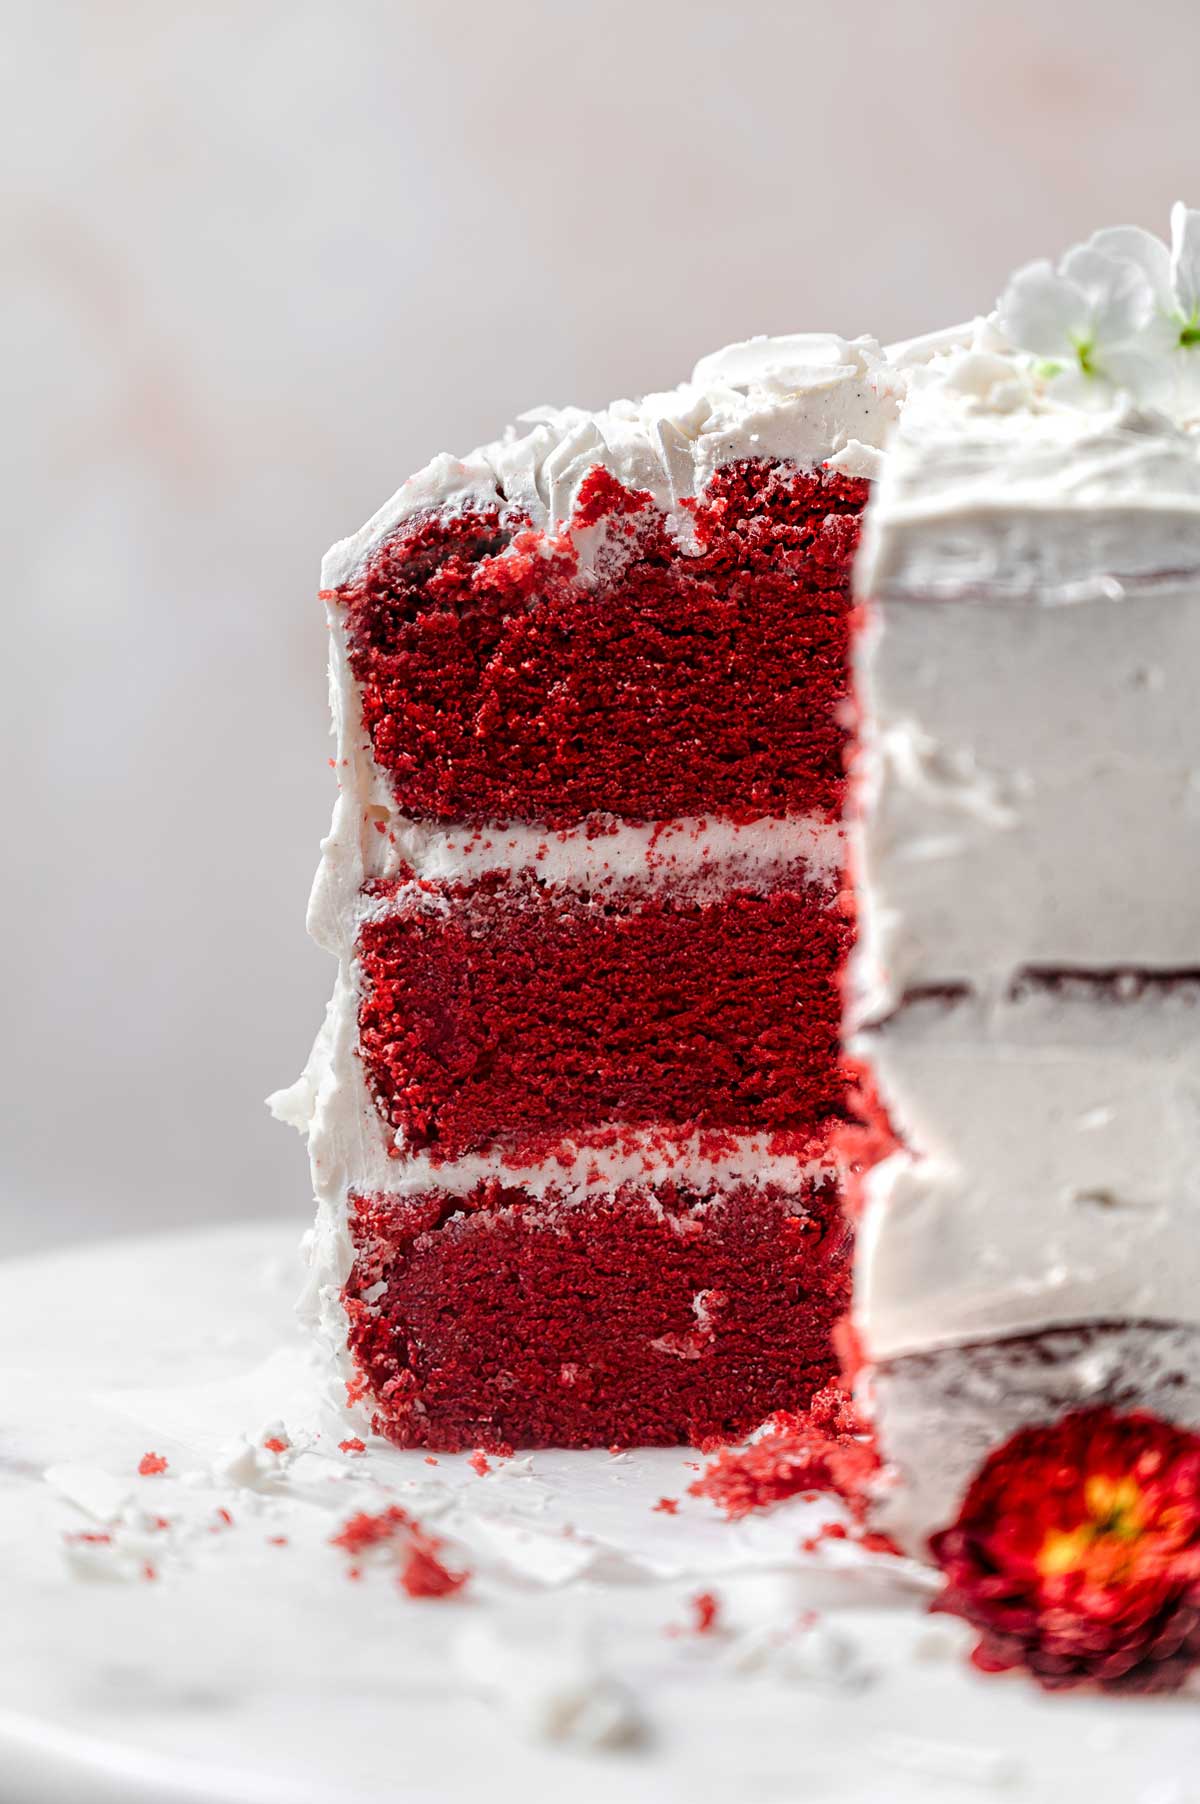
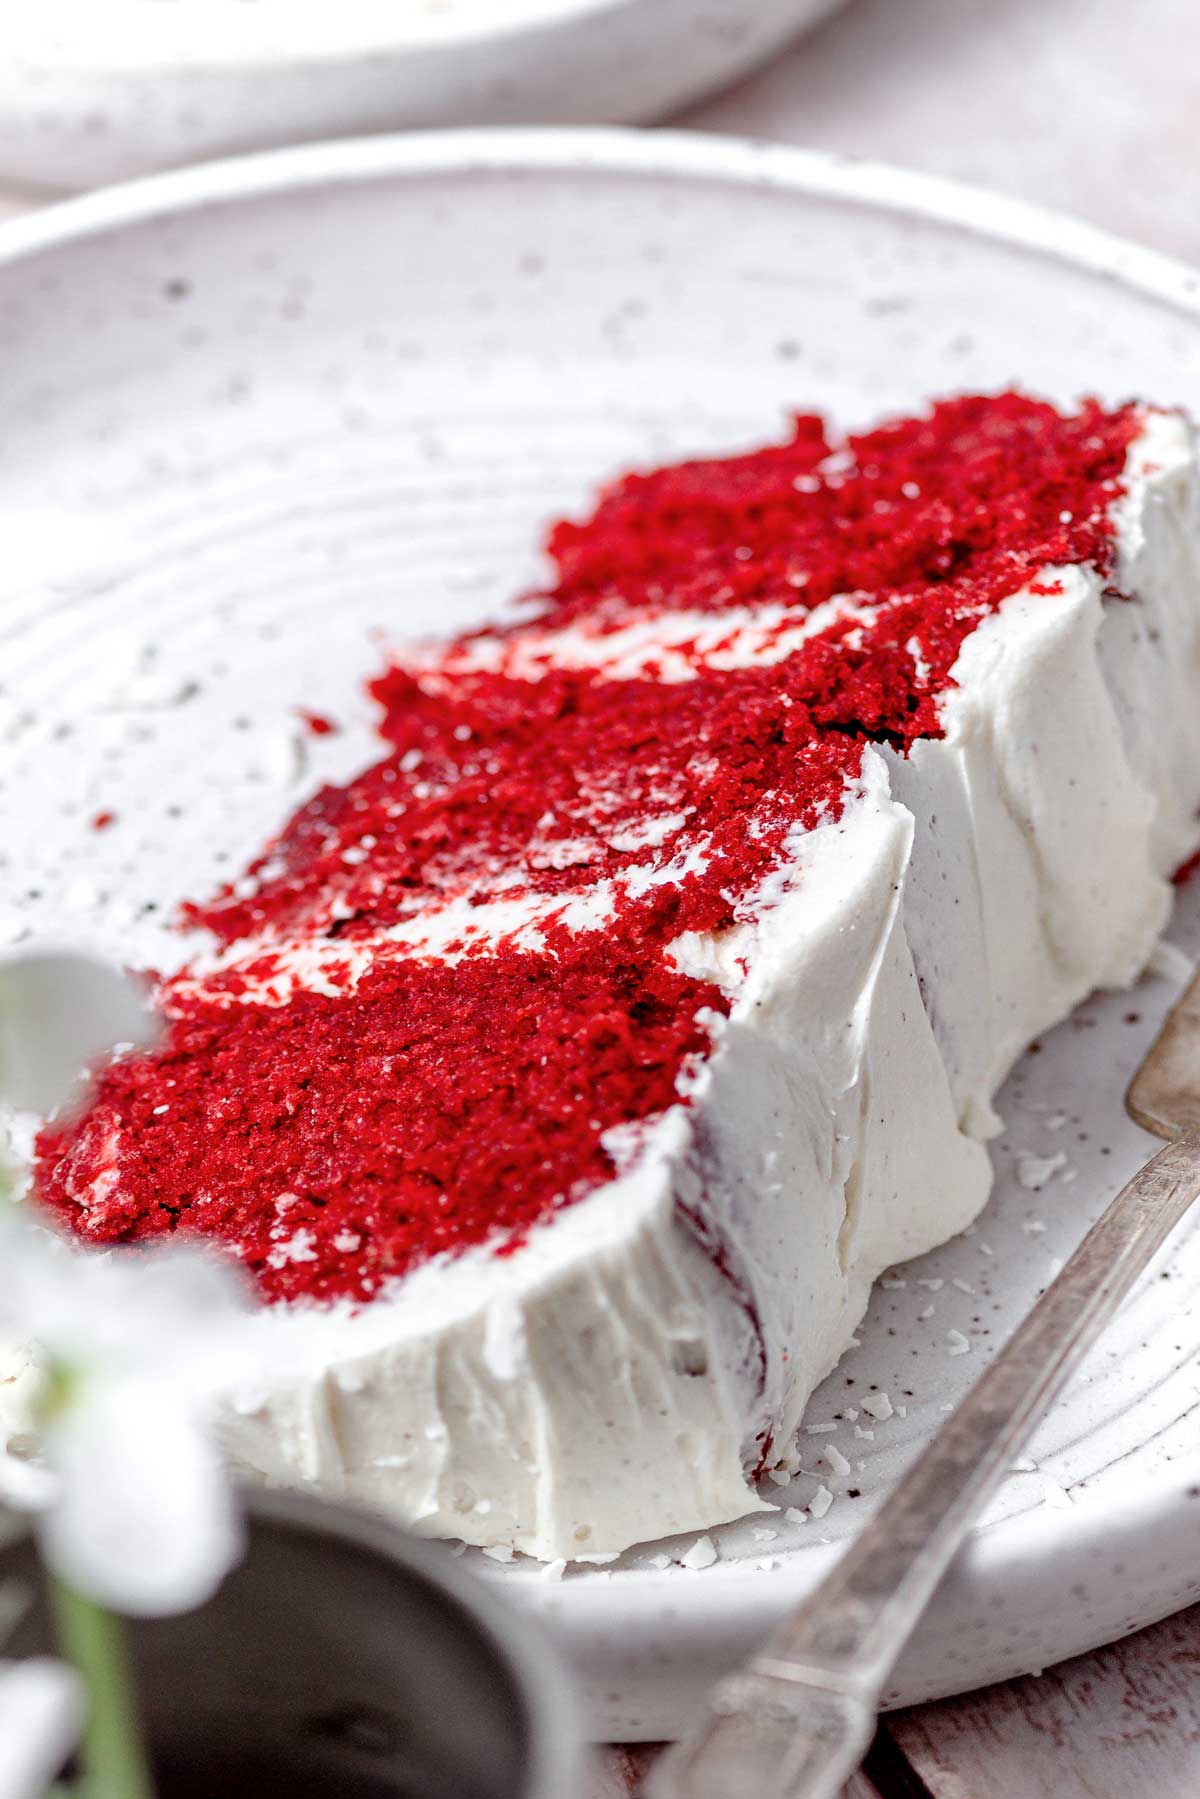
This easy eggless red velvet cake has a tender, moist crumb, a rich flavor, and beautiful vibrant red color. It’s topped with a sweet yet tangy whipped vegan vanilla bean cream cheese frosting. The cake can be made in one bowl, and is also dairy free, making this recipe entirely vegan-friendly.
If you love classic cakes as much as I do, then be sure to also try out my vegan vanilla cake and this super decadent vegan Biscoff cake next!
Why You’ll Love This Eggless Red Velvet Cake
- Tender, Moist & Velvety Texture: Dairy free yogurt replaces the eggs in this recipe, giving the cake a super moist texture that slices and holds together beautifully.
- Rich Flavor and Intense Color: A mild cocoa flavor runs through this cake and it has a rich crimson color.
- One Bowl: Fewer dishes are always better- no need to use separate bowls for the wet and dry ingredients.
- Easy to Follow Recipe: Follow along with the step-by-step photos and video tutorial.
The Ingredients

Ingredient Highlights & Some Swaps
This vegan red velvet cake uses a handful of ingredients, most of which are pantry staples that can be found at your local grocery store. You may need to order red food coloring online if you’re not able to find it in stores.
For the Vegan Red Velvet Cake
- Vegetable Oil: To keep the cake extra moist. It can be substituted for melted dairy-free butter or for another oil, like coconut oil.
- Unsweetened Dairy Free Yogurt: To help hold together the cake & replace the eggs in traditional cake recipes. It can be subbed 1 for 1 with dairy based products.
- Dairy Free Milk: Like almond milk, oat milk, or coconut milk
- Pure Vanilla Extract: Vanilla essence gives the cake an aromatic flavor
- Vinegar: To help give the cake its characteristic tangy flavor, and to help the cake rise in the oven
- All Purpose Flour: Or you can use cake flour
- Unsweetened Cocoa Powder: To give the cake its characteristic subtle cocoa flavor
- Baking Powder & Baking Soda: To help leaven the cake
- Cream of Tartar: This is optional, but it helps give the cake a subtle tang and helps the red color stay vibrant even after baking
- Red Food Coloring: If making this cake completely vegan, be sure to order a vegan-friendly red food coloring. You can also opt for natural food coloring like beet powder instead of gel food color. Note: the color won’t be as intense as in the photos.
For the vanilla bean cream cheese frosting
- Softened Salted Vegan Butter
- Softened Vegan Cream Cheese: My homemade dairy-free cream cheese works here. For storebought, I like to use Follow Your Heart or Trader Joe’s dairy-free cream cheese. They’re not too tangy and have a good texture.
- Vanilla Bean Paste: or you can sub vanilla extract
- Powdered Sugar or Icing Sugar

Step by Step Instructions
🎥 *Video Tutorial is Above the Recipe Card Below!*
To Make the Cake Batter

Cream the oil / melted vegan butter and sugar together in a large bowl until light and fluffy. Add the room temperature dairy-free yogurt, vanilla, vinegar and room temperature dairy-free milk. Whisk to combine.

Sift the all-purpose flour, cocoa powder, baking powder, baking soda, salt, & cream of tartar (if using) on top.

Mix the wet ingredients and dry ingredients together until the lumps of flour are gone and just combined.

Add the food coloring and mix until incorporated and the batter reaches your desired color.
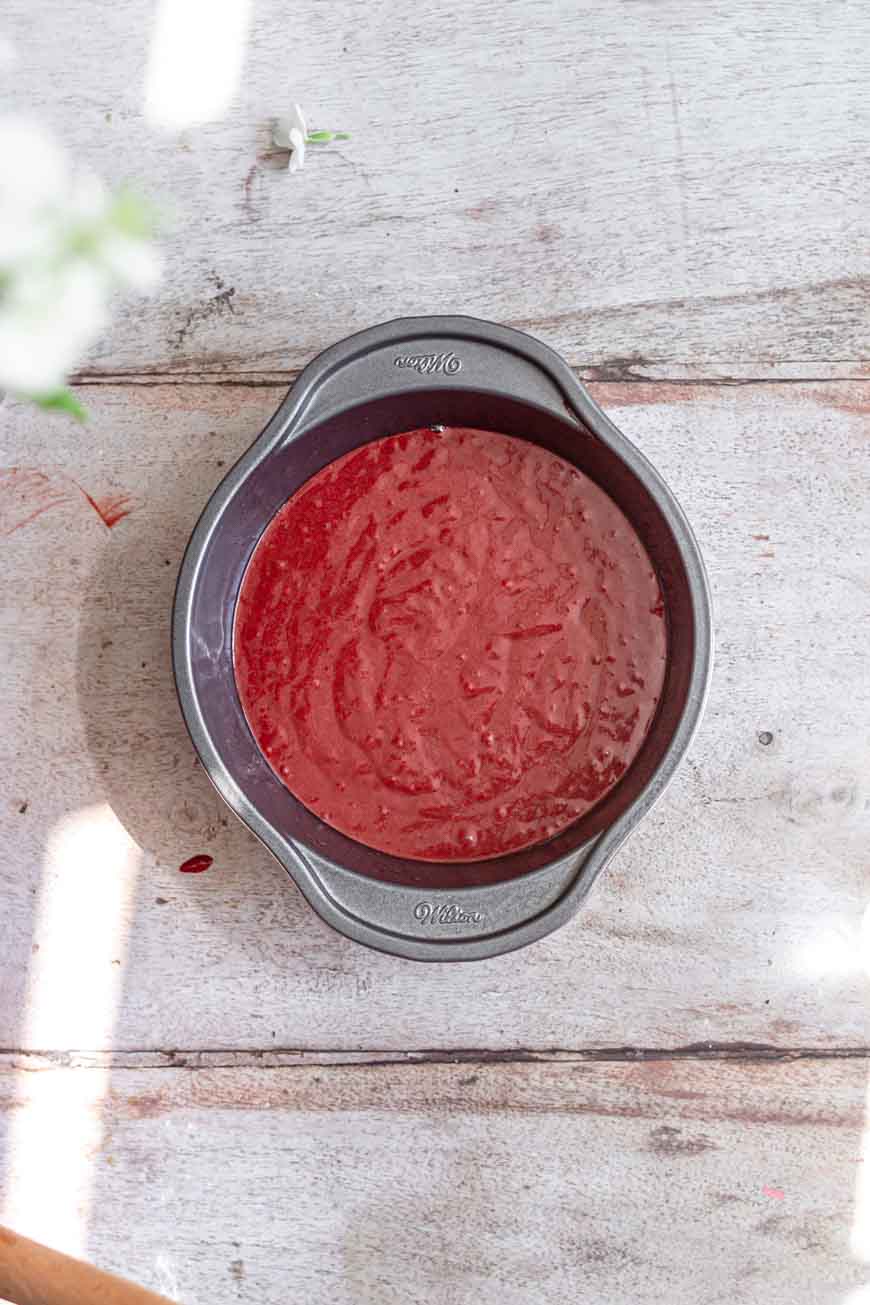
Pour the batter into the prepared cake tins. Smooth out the tops. Bake for 23-26 minutes (6” pans) or 30-35 minutes (8” pans) in the preheated oven.

Remove the cakes and let them cool in the pans for 5-10 minutes. Then, remove the cakes from the pans and place them on a wire rack to finish cooling.
To Make the Vegan Vanilla Cream Cheese Buttercream Frosting
Cream the vegan butter and vegan cream cheese with a hand mixer or stand mixer for 2-3 minutes until fluffy. Add the vanilla bean paste.
Add the powdered sugar (or icing sugar) 1 cup at a time. Mix on medium-high speed the frosting until it is light and fluffy and all of the sugar has been added, about 5 minutes.
📌 TIP: The frosting should be stiff enough to hold its shape, but still fluffy and creamy.

How to Assemble the Cake
Flip the first layer upside down (so the flat side is facing up). You can also slice the domed top off of the cake to create a flat surface. Spread an even layer of frosting on top of the cake.
Stack the next layer of cake on the cream cheese frosting with the flat side facing up. Spread more frosting on top. Top it off with the 3rd cake layer.
Apply a crumb coat of frosting to the cake layers. Once frosted, sprinkle the top with chopped vegan white chocolate.

Serving the Vegan Red Velvet Cake
This eggless red velvet cake is perfect for a special occasion or for the holidays like Christmas or Valentine’s Day.
Serve a slice of this cake alongside a cup of milk (almond milk is great!) or a cup of coffee.
The tangy cream cheese frosting is the perfect accompaniment for the cake, but feel free to serve it with a scoop of vanilla ice cream as well.

Storage Tips
- Fridge: The cake can be stored in the fridge, wrapped loosely in plastic wrap or in an airtight container for 1-2 days.
- Freezer: After 1-2 days, I recommend freezing slices of the cake to help it retain its moisture. Wrap the cake with plastic wrap and place the slices in a freezer-proof baggie. Store in the freezer for 2-3 months.
Helpful Tips for the BEST Red Velvet Cake
- Use room temperature dairy free yogurt and milk: room temperature ingredients help everything cream together easier and creates a better cake texture.
- Tap the pans before baking to remove air bubbles from the batter: this will help create a close crumb without holes.
- Bake the cake soon after mixing the batter together: because this batter has vinegar in it, the chemical reaction that helps it rise begins as soon as you mix the wet and dry ingredients together. The cake needs to be baked promptly after mixing the batter together for the best results.
- Let the cake cool completely before frosting: to prevent the icing from melting and losing its shape.
Troubleshooting
My cakes look like they sunk in the middle. What Happened?
- If the cakes look like they sunk, it’s most likely because they are under-baked. The tops of the cakes should be smooth, and slightly domed when done baking.
- A toothpick or knife inserted in the middle should remove cleanly.
My frosting is too sweet. How do I fix it?
- If your buttercream is too sweet for your liking, I recommend creaming together another 2-3 tbsp of cream cheese in a separate bowl.
- Once light and fluffy, add the cream cheese back to the frosting mixture and mix to incorporate.
- You can also add 1 tbsp of cornstarch (or corn flour) to the frosting at a time until it is no longer as sweet.
Vegan Red Velvet Cake FAQs
Yes, red velvet cake can be made without eggs. This recipe uses dairy free yogurt to replace the eggs.
Yes, you can make red velvet cake without dairy based buttermilk. This recipe uses dairy free milk and vinegar to replace buttermilk.
More Vegan & Eggless Cakes


Eggless Red Velvet Cake with Cream Cheese Frosting
Rate this RecipeIngredients
Wet
- ½ cup vegetable oil, 110g or melted vegan butter
- 1 ½ cups granulated sugar, 300g
- 1 cup plain non-dairy yogurt, 230g – unsweetened plain or vanilla-flavored, room temperature
- 1 tbsp pure vanilla extract
- 1 cup dairy-free milk, like soy milk – room temperature
- 1 ½ tbsp apple cider vinegar, or white vinegar
Dry
- 2 ½ cups cake flour, 320g – or all purose flour
- 3 tbsp 16g unsweetened cocoa powder, 16g
- 2 tsp baking powder, 8g
- ½ tsp baking soda, 4g
- ½ tsp salt
- ½ tsp cream of tartar, optional (see notes)
- 2-4 tsp red food coloring, adjust to preference (or use beetroot powder)
Dairy-Free Cream Cheese Frosting
- 1 recipe vegan cream cheese frosting
Instructions
To Make the Cake
- Preheat the oven to 350°F or 175°C. Grease 3 6” (15.24 cm) round cake pans or 2 8” (23cm) round cake pans. Cut out circles of parchment paper and lay them in the bottom of the pans.
- Cream the oil and sugar together until light and fluffy. Add the room temperature dairy free yogurt, vanilla, vinegar and dairy free milk. Whisk to combine.½ cup vegetable oil, 1 ½ cups granulated sugar, 1 cup plain non-dairy yogurt, 1 tbsp pure vanilla extract, 1 cup dairy-free milk, 1 ½ tbsp apple cider vinegar
- Sift the flour, cocoa powder, baking powder, baking soda, salt and cream of tartar (if using) on top.2 ½ cups cake flour, 3 tbsp 16g unsweetened cocoa powder, 2 tsp baking powder, ½ tsp baking soda, ½ tsp salt, ½ tsp cream of tartar
- Mix the wet and dry ingredients together until lump free and just combined. Add the food coloring and mix until incorporated and the batter reaches your desired color.
- Pour the batter into the prepared cake pans. Smooth out the tops.
- Bake for 23-26 minutes (6” pans) or 30-35 minutes (8” pans). A toothpick inserted into the center of the cake should remove cleanly when done. The cakes should have smooth, slightly domed tops when done baking.
- Remove the cakes and let them cool for 5-10 minutes in the pans. Then, remove the cakes from the pans and place them on a wire rack to finish cooling. Frost the cake with the vegan cream cheese frosting once completely cooled. Once frosted, sprinkle the top with chopped vegan white chocolate.
Video
Recipe notes
- The dairy-free yogurt and milk can be subbed 1 for 1 with dairy based products.
- This recipe calls for cream of tartar because it helps the food coloring I used stay vibrant even after baking. Check the instructions on your food coloring.
- Tap the pans before baking to remove air bubbles from the batter: this will help create a close crumb without holes.
- Bake the cake soon after mixing the batter together: because this batter has vinegar in it, the chemical reaction that helps it rise begins as soon as you mix the wet and dry ingredients together. The cake needs to be baked promptly after mixing the batter together for the best results.
- Let the cake cool completely before frosting: to prevent the icing from melting and losing its shape
Did You Make This?
Leave a star rating and a comment below to let others know how it turned out for you!


Categories:
Baked Goods, Christmas, Date Night, Seasonal, Valentine's Day, Vegan Cakes, Vegan Comfort Food, Vegan Dessert Recipes, Vegan Recipes,


Hello! This looks delicious. Can I ask if you’ve actually hand weighed your flour here for the dry ingredients? Just wondering if I should go by your weight or volume measurements to ensure accuracy for the final bake. I know some people measure out their flour differently. Also do you use the liquid or gel red food dye? Thanks for sharing!
Hi Erin, I hand measure all my recipes. Going by weight will ensure best results! I used a gel red food dye, but liquid should also work.